The Asus U36SG ultrabook, a spectacular laptop for its time, launched with a spinning harddrive. One of the best system upgrades is replacing a spinning harddrive with an SSD harddrive. Benefits include better throughput performance on your system, longer battery life, a lighter laptop, and a cooler & quieter environment.
Getting to the harddrive requires a bit of work with this model. It’s at the top rather than the bottom of the laptop and has no convenient side-tray to pull it out; you must remove the top panel of the laptop to access it. I’m pretty sure that this will void your warranty so do not continue unless warranty is not an issue.
To clarify for those wondering, a standard 2.5″ harddrive (~9mm height) will fit; you do not need one of the super slim 7mm harddrives. I swapped in a Corsair Force Series 3 120gb drive.
Step 1: Removing RAM & disconnecting the cables
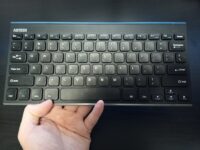
First, turn the laptop off and remove the battery pack. Flip it upside down, unscrew and open the central panel, and pop out the RAM. We must then carefully disconnect the keyboard and track-pad cables. Follow the directives in the image below for working the black clasps and the cables should slip right out.

Below is an image showing the cables disconnected correctly. Do not use force; the clasps should easily move and the cables should slip out effortlessly.

Step 2: Unscrewing the bottom panel
Next, we must unscrew all 10 screws from the bottom panel so that you can lift the top panel afterwards. Unfortunately, 4 of the screws are underneath the rubber feet so you will need to peel those off. No worries, a bit of gluegun or epoxy will stick them back on good as new.

Step 3: Prying the top panel off
Now that the cables are disconnected and the screws are out, we have to lift the top panel off from the bottom panel. The top panel is held into place by hooks. You will need to insert a small lever and work your way around the seam, prying the top panel free. This requires mostly patience and dexterity. I used two flathead micro screwdrivers but I’ve read that it can be accomplished with a lockpick or a credit card. Put the laptop on its bottom and go at it.

Once the panel is loosened all the way around it should easily lift off, exposing the guts of the machine. We’re almost done!

Step 4: Replacing the harddrive
Out with the old, in with the new! Now it’s simply a matter of carefully unscrewing the harddrive chasis (mind those cables), sliding it out, swapping harddrives, and putting it back in. Along with putting the cables, ram, and screws back of course. Then boot the laptop and congratulate yourself on a job well done!